
Mutation Timeline
Following Each Change to a JavaScript Sample
Mutation Timeline
Following Each Change to a JavaScript Sample
Introduction
A JavaScript fuzzer rarely builds a complex sample in one step. It may change an operator, insert a statement, replace a loop body, and then make further changes to the code it introduced. By the time we inspect the final sample, all of those steps have been combined into one program.
The final sample tells us what was generated, but not how it reached that form. We cannot immediately see which mutation changed its behavior, where a new structure came from, or whether a later mutation depended on an earlier one.
Consider a small operator change:
One mutation changes = to -=:
Only one character changed, but the second statement reads the existing property value before subtracting Infinity. If the property has not been set, the result becomes NaN. Finding this line in a large final sample is possible, but the final sample does not tell us when the change happened.
A later mutation can also modify code created by an earlier one:
Another mutation then changes the loop body:
The final program contains the completed loop, but it does not show that two separate mutations produced it. That order matters when we want to understand which changes made later changes possible.
Seeing each mutation separately changes how we analyze the result. We can find the first step that changed the program’s behavior, see when new code appeared, and follow how later mutations built on earlier ones. This also gives us concrete information for deciding what the next mutation run should keep or change.
Without that history, we have to work backwards from the final program and guess how its parts are connected. A mutation timeline turns the result into a sequence of changes that we can inspect from beginning to end.
Starting With a Small JavaScript Sample
SeekZero provides this step-by-step view through the Mutation Timeline in a Mutation Plan preview. We can move through the mutations in order and compare the program before and after each step.
For this example, we create a new campaign and let SeekZero build its initial corpus from the campaign configuration. We then select this small generated sample:
The sample creates an anonymous function and adds a property whose value is Infinity. It is short enough that every change to the original code is easy to recognize.
We create a Mutation Plan from that sample. We keep the campaign’s mutation settings and do not add Code Targeting, Lock, or Preserve rules. This leaves the sample open to general mutation and keeps the walkthrough focused on the Timeline.
The selected sample and the syntax tree that SeekZero uses to build the Mutation Plan.
From a Small Sample to the Final Result
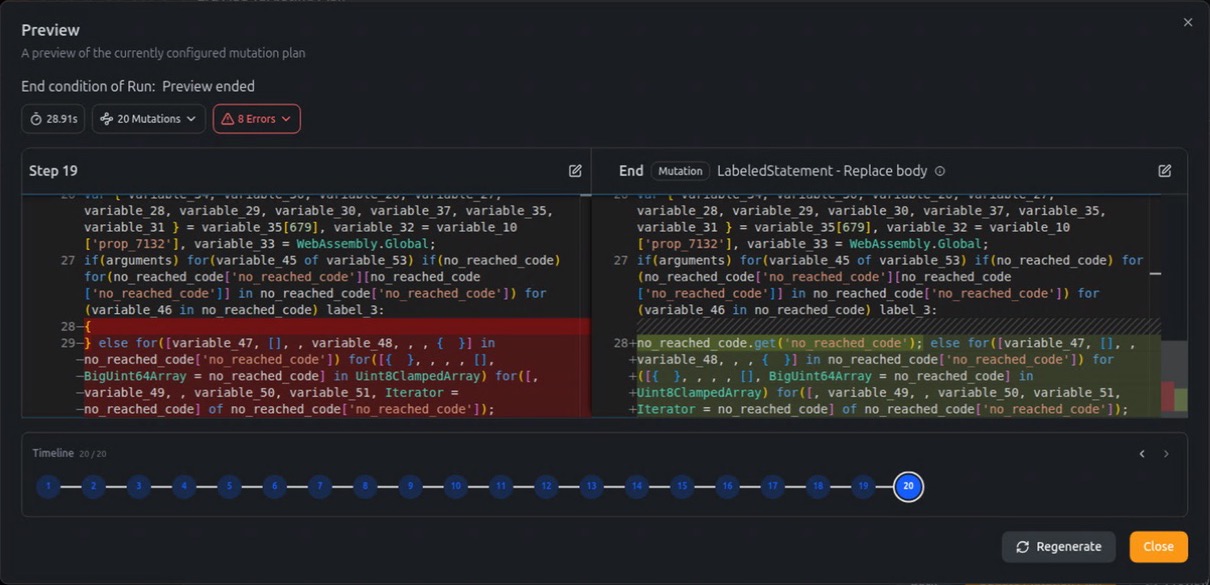
We now generate a preview from this Mutation Plan. After 20 mutations, our three-line sample has become a much larger program with new variables, loops, functions, and built-in objects. The final view compares step 19 with step 20 and shows that the last mutation replaced the body of a generated label. It does not show when the rest of the code appeared.
By the final step, the original sample has grown into a much larger program. This comparison only explains the last change.
To understand where the other structures came from and how they changed, we need to inspect the earlier steps. The Mutation Timeline gives us that history.
Mutation Timeline in SeekZero
The Timeline appears below the code comparison in the Mutation Plan preview. Each numbered point represents one mutation that was kept. Selecting a point shows the previous version on the left and the new version on the right, with the changed lines highlighted. The mutation name above the code tells us what SeekZero changed.
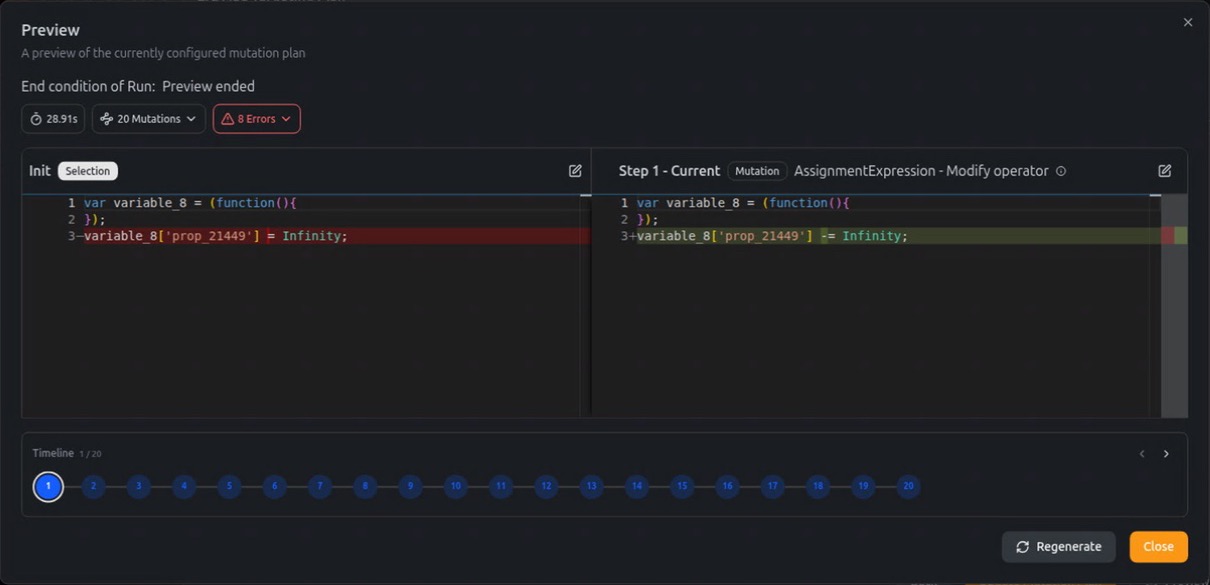
With Step 1 selected, the original sample is on the left, the changed sample is on the right, and the full 20-step Timeline remains visible below them.
The preview details remain visible while we move through the Timeline. This run finished in 28.91 seconds and reports 20 mutations and 8 errors as separate counts. The Timeline contains 20 numbered steps for the changes that were kept, allowing us to follow how the final sample was built.
Demo: Following One Sample Step by Step
Starting with the first point shown above, we move forward through the generated sample. Rather than covering every mutation, we stop at three moments that show why the order matters.
The First Change
The first mutation changes the property assignment operator from = to -=:
The Timeline labels this mutation as AssignmentExpression - Modify operator. Instead of assigning Infinity, the new code subtracts Infinity from the property’s existing value. That property has not been set yet, so its value is undefined and the subtraction produces NaN. One character has changed what the sample does, and the Timeline shows that this happened before any new code was added.
Returning to Code Added Earlier
Step 2 adds several statements before the original sample. Part of that generated code creates an array and iterates over it with a for...of loop:
At step 13, SeekZero returns to that generated loop. The ForOfStatement - Replace body mutation replaces its empty block with an empty statement:
This code was not present in the starting sample. Without the Timeline, we would see the loop in the final variant but would not know that one mutation created it and another changed it eleven steps later.
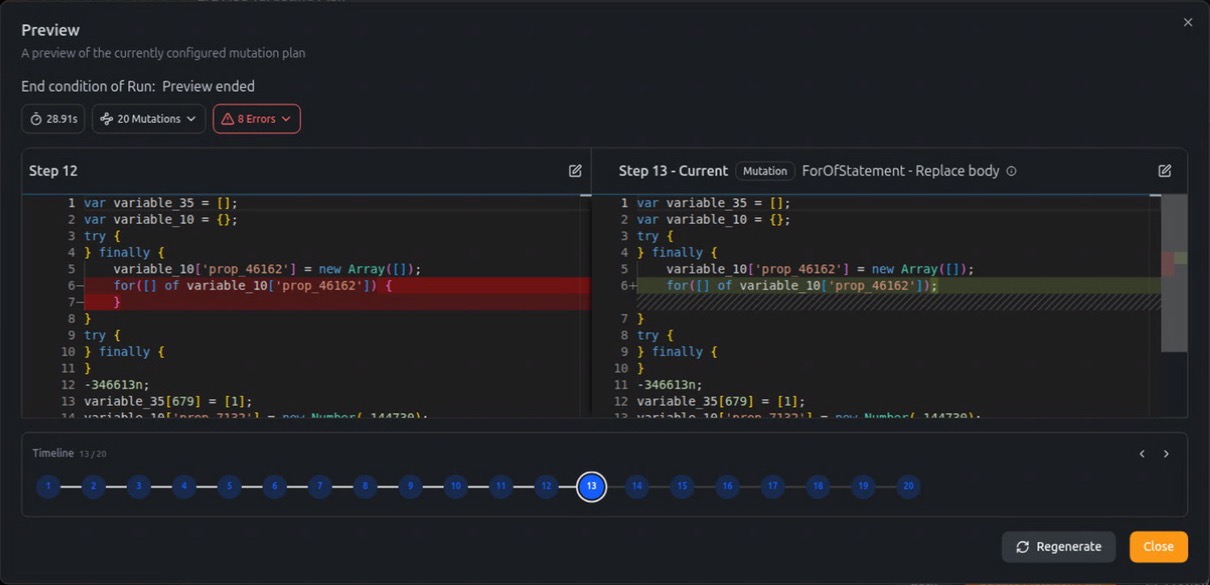
Step 13 returns to the loop created earlier and replaces its body.
The Final Change
At step 20, we reach the final view shown earlier. The LabeledStatement - Replace body mutation replaces a generated label’s empty body with a call. Like the loop at step 13, this label was added during the run. We can now place that last change in the sequence that produced the larger program.
Using the Timeline to Improve a Mutation Plan
Returning to the original sample, we now have a specific decision to make: should the assignment be allowed to change? If assigning Infinity is important, we can lock the assignment before the next preview. If changes to the operator are useful, we can leave it open to mutation. The Timeline gives us the information needed to make that choice.
The same process applies to the rest of the sample. We can lock a part that should not be mutated or preserve a structure that should not be replaced or removed. After generating another preview, the Timeline shows how those choices affected the result. It can also show when a plan is too restrictive. If every accepted mutation changes only small values while the surrounding program stays almost identical, we may choose to allow more of the sample to change.
The goal is to understand what the plan produces and adjust it based on changes we can see.
Final Thoughts
The first Timeline point showed exactly when the original assignment changed. Later points showed that new code can be added in one step and changed again in another. This history helps us understand the final sample and decide what the next Mutation Plan should allow, lock, or preserve.
References
Mutation Timeline
Following Each Change to a JavaScript Sample
Mutation Timeline
Following Each Change to a JavaScript Sample
Introduction
A JavaScript fuzzer rarely builds a complex sample in one step. It may change an operator, insert a statement, replace a loop body, and then make further changes to the code it introduced. By the time we inspect the final sample, all of those steps have been combined into one program.
The final sample tells us what was generated, but not how it reached that form. We cannot immediately see which mutation changed its behavior, where a new structure came from, or whether a later mutation depended on an earlier one.
Consider a small operator change:
One mutation changes = to -=:
Only one character changed, but the second statement reads the existing property value before subtracting Infinity. If the property has not been set, the result becomes NaN. Finding this line in a large final sample is possible, but the final sample does not tell us when the change happened.
A later mutation can also modify code created by an earlier one:
Another mutation then changes the loop body:
The final program contains the completed loop, but it does not show that two separate mutations produced it. That order matters when we want to understand which changes made later changes possible.
Seeing each mutation separately changes how we analyze the result. We can find the first step that changed the program’s behavior, see when new code appeared, and follow how later mutations built on earlier ones. This also gives us concrete information for deciding what the next mutation run should keep or change.
Without that history, we have to work backwards from the final program and guess how its parts are connected. A mutation timeline turns the result into a sequence of changes that we can inspect from beginning to end.
Starting With a Small JavaScript Sample
SeekZero provides this step-by-step view through the Mutation Timeline in a Mutation Plan preview. We can move through the mutations in order and compare the program before and after each step.
For this example, we create a new campaign and let SeekZero build its initial corpus from the campaign configuration. We then select this small generated sample:
The sample creates an anonymous function and adds a property whose value is Infinity. It is short enough that every change to the original code is easy to recognize.
We create a Mutation Plan from that sample. We keep the campaign’s mutation settings and do not add Code Targeting, Lock, or Preserve rules. This leaves the sample open to general mutation and keeps the walkthrough focused on the Timeline.
The selected sample and the syntax tree that SeekZero uses to build the Mutation Plan.
From a Small Sample to the Final Result
We now generate a preview from this Mutation Plan. After 20 mutations, our three-line sample has become a much larger program with new variables, loops, functions, and built-in objects. The final view compares step 19 with step 20 and shows that the last mutation replaced the body of a generated label. It does not show when the rest of the code appeared.
By the final step, the original sample has grown into a much larger program. This comparison only explains the last change.
To understand where the other structures came from and how they changed, we need to inspect the earlier steps. The Mutation Timeline gives us that history.
Mutation Timeline in SeekZero
The Timeline appears below the code comparison in the Mutation Plan preview. Each numbered point represents one mutation that was kept. Selecting a point shows the previous version on the left and the new version on the right, with the changed lines highlighted. The mutation name above the code tells us what SeekZero changed.
With Step 1 selected, the original sample is on the left, the changed sample is on the right, and the full 20-step Timeline remains visible below them.
The preview details remain visible while we move through the Timeline. This run finished in 28.91 seconds and reports 20 mutations and 8 errors as separate counts. The Timeline contains 20 numbered steps for the changes that were kept, allowing us to follow how the final sample was built.
Demo: Following One Sample Step by Step
Starting with the first point shown above, we move forward through the generated sample. Rather than covering every mutation, we stop at three moments that show why the order matters.
The First Change
The first mutation changes the property assignment operator from = to -=:
The Timeline labels this mutation as AssignmentExpression - Modify operator. Instead of assigning Infinity, the new code subtracts Infinity from the property’s existing value. That property has not been set yet, so its value is undefined and the subtraction produces NaN. One character has changed what the sample does, and the Timeline shows that this happened before any new code was added.
Returning to Code Added Earlier
Step 2 adds several statements before the original sample. Part of that generated code creates an array and iterates over it with a for...of loop:
At step 13, SeekZero returns to that generated loop. The ForOfStatement - Replace body mutation replaces its empty block with an empty statement:
This code was not present in the starting sample. Without the Timeline, we would see the loop in the final variant but would not know that one mutation created it and another changed it eleven steps later.
Step 13 returns to the loop created earlier and replaces its body.
The Final Change
At step 20, we reach the final view shown earlier. The LabeledStatement - Replace body mutation replaces a generated label’s empty body with a call. Like the loop at step 13, this label was added during the run. We can now place that last change in the sequence that produced the larger program.
Using the Timeline to Improve a Mutation Plan
Returning to the original sample, we now have a specific decision to make: should the assignment be allowed to change? If assigning Infinity is important, we can lock the assignment before the next preview. If changes to the operator are useful, we can leave it open to mutation. The Timeline gives us the information needed to make that choice.
The same process applies to the rest of the sample. We can lock a part that should not be mutated or preserve a structure that should not be replaced or removed. After generating another preview, the Timeline shows how those choices affected the result. It can also show when a plan is too restrictive. If every accepted mutation changes only small values while the surrounding program stays almost identical, we may choose to allow more of the sample to change.
The goal is to understand what the plan produces and adjust it based on changes we can see.
Final Thoughts
The first Timeline point showed exactly when the original assignment changed. Later points showed that new code can be added in one step and changed again in another. This history helps us understand the final sample and decide what the next Mutation Plan should allow, lock, or preserve.